xinference 介绍
Xorbits Inference (Xinference) 是一款面向大模型的推理平台,支持大语言模型、向量模型、文生图模型等。 它底层基于Xoscar 提供的分布式能力,使得模型可以在集群上部署,上层提供了类OpenAI 的接口,用户可以在上面部署和调用开源大模型。
bge-reranker 介绍
BGE-Reranker-Large 是由北京智源研究院(BAAI)推出的开源检索排序模型,属于 BGE(BAAI General Embedding)系列的重要组件,专为提升 RAG(检索增强生成)系统的检索精度而设计。配合 BGE-M3 嵌入模型,端到端检索质量最优(Llama-Index 评测)
PS:个人理解为将所有东西Embedding首次排序,排序后交给bge-reranker-large 进行精细排序,排序完成后最后由语言模型如deepseek-R1:70B将结果进行最后总结并输出。
用户查询
   │
   ├──▶ Embedding 模型:生成向量  ──► 向量库 ANN 检索 ──► Top-K 粗排结果
                                         │
                                         ▼
                          Reranker 模型:精细语义匹配重排
                                         │
                                         ▼
                             Top-N 精选最终结果
                                         │
                                         ▼
                             排序后的 Top-N 高相关文档
                                         │
                                         ▼
                DeepSeek-R1:70B LLM:结合 Query + Top-N 文档,上下文生成答案
参考文档:ubuntu部署xinference,以及接入dify(涵盖遇到的所有坑,超级详细版)
部署xinference 和下载 bge-reranker-large
已在真实环境中的安装CUDA和显卡驱动。(CUDA 版本:12.4 显卡驱动版本:550.144)
创建虚拟环境xinference;
root@stone:~# conda create -n xinference python=3.10
进入虚拟环境;
root@stone:~# conda activate xinference
下载xinference 的Python依赖;
(xinference) root@stone:~# pip install "xinference[all]" -i https://pypi.tuna.tsinghua.edu.cn/simple
启动xinference (后续启动过程可以用脚本代替);
(xinference) root@stone:~# xinference-local --host 0.0.0.0 --port 9997
下载并启动bge-reranker-large模型
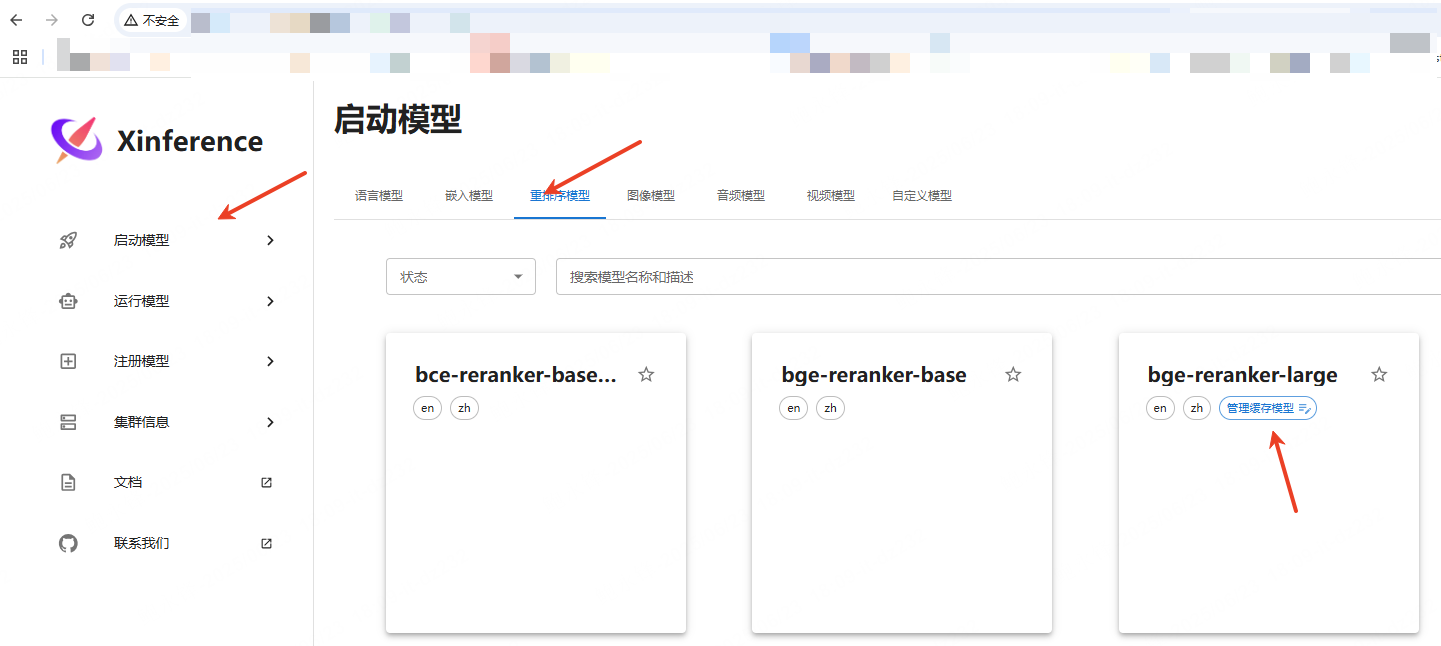
在浏览器中输入xinference IP:9997 即可进入ui页面。选择【启动模型】->【重排序模型】->选择【bge-reranker-large】;

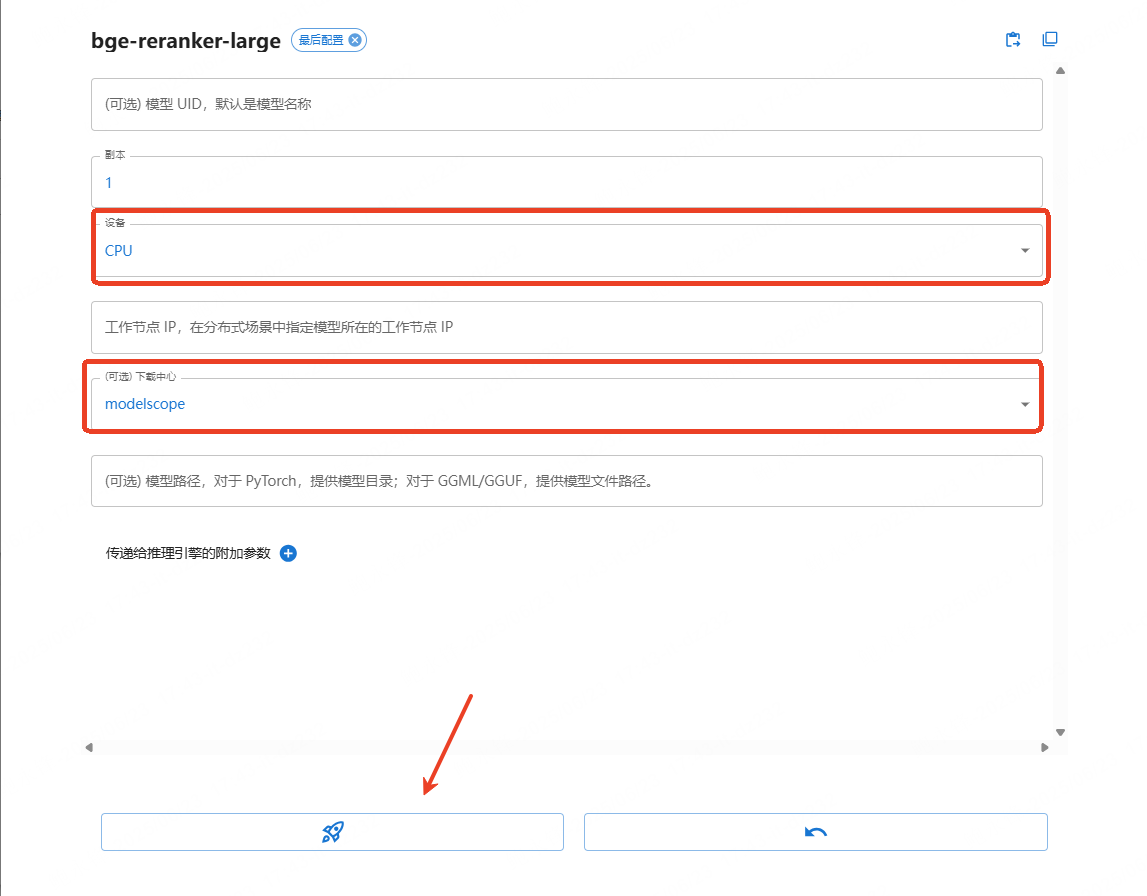
点击小火箭。首次点击小火箭是下载,第二次点击则为运行,下载时可选GPU或CPU,如GPU显存不够,可通过cpu下载运行。此模型所耗资源较少,可使用cpu;可指定下载中心。此处指定modelscope;

运行成功后在【运行模型】->【重排序模型】->可看到已下载并运行的【bge-reranker-large】。

PS:
xinference 启动脚本(此脚本只能运行xinference 平台,无法同时启动里面的bge-reranker-large,此脚本需再次优化):
#!/bin/bash

CONDA_SH="/opt/anaconda3/etc/profile.d/conda.sh"
CONDA_ENV_NAME="xinference"
XINFERENCE_PORT=9997
XINFERENCE_LOG="/var/log/xinference.log"
MODEL_NAME="bge-reranker-large"
MODEL_UID="bge-reranker-large"
MODEL_PATH="/home/xin/xinference_models/modelscope/models/Xorbits/bge-reranker-large"

# 激活环境
if [ -f "$CONDA_SH" ]; then
  source "$CONDA_SH"
  conda activate "$CONDA_ENV_NAME"
else
  echo "[ERROR] Conda profile not found: $CONDA_SH"
  exit 1
fi

# 启动服务(如未运行)
if ! ss -ltnp | grep -q ":$XINFERENCE_PORT"; then
  echo "[INFO] 启动 Xinference 服务..."
  nohup xinference-local --host 0.0.0.0 --port $XINFERENCE_PORT > "$XINFERENCE_LOG" 2>&1 &
else
  echo "[INFO] Xinference 已在运行端口 $XINFERENCE_PORT"
fi

# 等待端口启动
echo "[INFO] 等待 Xinference 启动..."
for i in {1..30}; do
  if ss -ltn | grep -q ":$XINFERENCE_PORT"; then
    echo "[INFO] Xinference 已启动成功"
    break
  fi
  sleep 1
done

# 加载模型(如果未加载)
EXISTING_MODEL=$(curl -s http://localhost:$XINFERENCE_PORT/v1/models | grep "$MODEL_UID")
if [ -n "$EXISTING_MODEL" ]; then
  echo "[INFO] 模型 $MODEL_UID 已经加载,跳过加载步骤"
else
  echo "[INFO] 加载模型 $MODEL_NAME ..."
  curl -s -X POST http://localhost:$XINFERENCE_PORT/v1/models \
    -H "Content-Type: application/json" \
    -d "{
          \"model_name\": \"$MODEL_NAME\",
          \"model_uid\": \"$MODEL_UID\",
          \"model_format\": \"pytorch\",
          \"model_size_in_billions\": 0.11,
          \"quantization\": \"none\",
          \"usage\": \"rerank\",
          \"model_engine\": \"transformers\",
          \"model_path\": \"$MODEL_PATH\"
        }"
  echo
fi

echo "[DONE] 启动完成。"
dify连接bge-reranker-large
在dify 的【模型供应商】中添加 【Xorbits Inference】并点击【添加模型】;

添加【模型类型】选择【Rerank】->【模型名称】和【模型UID】输入【bge-reranker-large】,其余默认即可,点击保存;

若出现【修改成功】即可;

此时在知识库Embedding 模型选择【bge-m3】,【检索设置】中,如【混合检索】中则选择【bge-reranker-large】模型。

PS:xinference 可以使用多显卡方式运行GPU,但在web页面中设置时未能按照预期启动多显卡,可能需修改配置文件。但本文针对bge-reranker-large,只要CPU核心够的话可以直接CPU运行。如使用语言模型则需要研究多显卡启动模型。
本文由 yorickbao 创作,采用 知识共享署名4.0 国际许可协议进行许可。
本站文章除注明转载/出处外,均为本站原创或翻译,转载前请务必署名。